Unordered List

Follow on Bloglovin

Friday 5 December 2014

Painted "Gibbard" side table

Paint and whitewash

Beautiful little table got even more charm. The table is solid walnut and has it's own character, I liked it right away when i saw it in the store. Now I've done painting it and I am quite satisfied :) The colour i used called relic and it is Decor art chalky paint, which I am getting to like more and more. After paint I applied Annie Sloan clear wax, and after all I used whitewashing technics to add antique look to it. It worked out good, you can imagine the table made out of stone with white patina.

Above are "before" & "after" pictures. And here are some more:


The label inside says "Gibbard. Solid walnut, furniture shop, established 1837, Napanee, Canada". Cool, isn't it? 

To make a whitewash you need to add water to paint to consistency of light cream, but not too runny, and with a brush apply to the surface, than in a minute wipe it all up with the rag. Wiping should go in the same direction. If you prefer thick wash (more colour) wipe in 3-4 minutes. Make sure you don't leave unwiped patches anywhere, that doesn't look natural.

 This item is for sale for local Edmontonians :) See my facebook page for contact:Shabby Moth and reDOem

Wednesday 26 November 2014

Vintage holiday decor

Easy tree ornaments made from dictionary pages

Holiday season! And I am here with my hand decorated ornaments I made a year ago. Probably won't show you anything new, but you can grab the idea for your holiday project or just for a craft with children. They look great on the tree - instant vintage look!
 

To make them I used  plastic balls like these:
So "before" ornaments weren't even with the smooth surface.  All the other materials you need are an old Webster dictionary that you can find in any goodwill or thrift store and a Mod Podge glue. First you will have to rip or cut dictionary pages into small stripes or any other shapes {ripping will give you thinner edges which helps better attaching and smoother transition from piece to piece}. Then just brush the glue onto pieces {both sides} and start covering the ball all around {you can put glue on the ball too}. You will get the creative mess on your working space but result is worth it :) 

To decorate more I cut off the dictionary illustrations and glued them on the ornaments. I think the pine cones look especially great for the occasion :) 

LIKE on facebook to see all the inspirational posts and tutorials Shabby Moth & reDOem

Monday 10 November 2014

DIY backdrop or how to make barn wood

How to make backdrop or barn wood quick and easy! 

{basic photography tips for handmade products}

I think this tutorial will be very helpful for crafters who are opening their online shop for the first time. To have a success in sales you need to present your product in the very best way; if you don't have a great pictures, I mean "wow" pictures, you can just give up the idea of selling online. I work on it right now, trying to do my best and still learning. There are basic rules to follow:
  •  Invest in tripod, shouldn't be the most expansive one: buy used one or ask friends if they have one they don't need. It almost impossible to make image absolutely clear without tripod. 
  • {here are lots of choices}
  • Use a white sheet of paper for backdrop, it changes quality of pictures instantly and brings it to the new level too.
     See how I made a progress using white paper as a backdrop in this post
  • Use indirect sun light, to avoid strong shadows. Natural light is a must and is the best! - unless you are professional photographer :) 
  • Use decorative backdrops and other objects that are in the same theme group to attract your customer by showing how the product fits to interior. For example (bucia.livemaster.ru) : 

So today I want to show you how to make such a backdrop very quick and easy using faux barn wood! PIN now and do it tonight :) 
To make it you will need:
  1. Cedar planks, pick the "ugliest" one with chips and wholes
  2. Dark wood stain
  3. White and blue chalk paint (can be any paint you have)
  4. Two small skinny planks to attach wood pieces together 1x0,5 inch. 
  5. Screws and screw driver or drill. 
Depending on the size of the backdrop you want pick your planks in the local hardware store. Cut them in needed amount of planks.
Then stain both sides and the visible edges of future product with the old sock or something like that. Don't forget rubber gloves to keep your hands clean. When stain is dry apply paint roughly with a brush , don't care about accuracy here. Make sure you leave the stain peeking through, especially on the edges. Look the picture below. This way you won't need to sand it later, which cuts the amount of  time you use.
Now do the same but  with different colour on the other side of the planks.I used duck egg blue and old white. After the paint is dry attach boards together with 1x0,5 in planks. See the picture below. I found screws that were bluish colour already, probably some anti-rust coating, and this was handy :)
You can play with colours and patterns, I liked mine like as it is. Plus you can use both sides. You can do all blue side and all white side as well. 

And here it's done. 
LIKE and Follow my facebook page for updates and inspirations: reDoem & Shabby moth 

How do you improve your photos? Are you a handmader with the online store, share your experience, please!

Monday 27 October 2014

Boutique preparation...

Hi, long time no see, I wish I could have more hours in a day!
I confess it's been awhile :) What I am doing? Really busy doing preparations before I can open my online shop, I want to call it "Shabby Moth boutique", so excited about all the ideas that crowded my head, projects and projects are just waiting in a long line.. For now I can say it is going to be handmade decor and gifts boutique on facebook at first and then I plan to open a store on etsy.
But for now I have a little sneak peek for you, let me know what you think about the whole idea?
These are my ZINC ORNAMENTS, good for hanging on the tree or just for putting them in the bowl for the coffee table or mantel! Great for holiday decorating. (To order contact me on facebook, link below)

Come and LIKE me facebook page where the grand opening will be announced too: ReDOem and Shabby Moth. Also I post there lots of inspirations about vintage décor in different styles.
Keep in touch!!!!

Friday 26 September 2014

Meet my friends

Happy fall to all :)
Today I want you to meet my good friends Barbara and Claudia. They both have lovely blogs where they are sharing their passion about home décor.
Barbara lives in Poland and is a master of decoupage and loves shabby chic style, also prefers the old French style in decorating.  I want to share with you her recent work - jewellery box, just click the image and visit her beautiful blog - you will learn about decoupage and decoration as it is in Poland!


Claudia lives in Germany and loves shabby chic in white, she decorates her own 300 year old home, and she does a beautiful job, click and look for yourself:


I am personally very interested in learning about how people decorate their homes in different countries, yeah, we all love shabby chic, but it has its own specific expression overseas. So if you are interested as well, check these girls out :)
Some more images from their blogs:  
                                                                       From Barbara
 photo DSC_1566Z_zpsbd75bf10.jpgStary kredens decoupage photo DSC_2983Z_zps6b9547df.jpg


                                                                From Claudia
Claudis Welt 1 photo DSC07879_zps36943671.jpg  photo DSC05552_zps73cad198.jpg
Please, comment and stay connected! 

Friday 22 August 2014

Old china cabinet becomes shabby beauty

...How I've painted and transformed the china cabinet


And another painting-waxing project is done. I am ready to present to you this little and cute, I believe china -, cabinet that became nice and beautiful shabby chic style piece of furniture. I needed this cabinet to put in the living room to fill and to be filled - to fill the corner and to be filled with all my little stuff I hoarded.
Here is before and after pictures:
To transform the cabinet I used Annie Sloan Old white and Duck Egg blue and clear wax. I removed the glass and inserted the chicken wire instead; I think with glass it just looked like simple boring thing and with wire it looks like something interesting, anyway  - the wire instantly gave it some character, to me it looks like cabinet that came from old french country. By the way, if you don't know HOW TO put the wire in, just use the big stapler and short staples, try not to shoot close to edges or the wood can crack if it is too thin. Before though you will have to measure how much wire you need, then cut it with scissors for iron: try to keep the cells whole and leave their connection wires on, you use them to staple wire to the frame.

As you can see on the picture above I added some decorative wooden ornaments to the doors and sides of this piece. I glued them on with PL 400, love this glue - fast and I know it will stick for sure.
I also distressed the thing with 220 sand paper, this time decided not to use dark wax, I loved it as it were already.
A bit impression of Duck Egg blue paint (first time use), honestly, I thought it would be more light. To me it looks like greyish blue, but I guess you can always add it to the white to make lighter....I love the colour anyway.

 How do you like the cutest cup I ever bought (at FIND). My lavender finally has found its home.

So what do you think, would you have this cabinet in your house?

Tuesday 19 August 2014

Give a shabby chic look to an old side table

With beautiful summer days I have absolutely no time to keep up with my updates here. Creating and painting in summer - posting in winter,  I guess :) I have lots of stuff to post, but trying to use sunny days to be outside and finish my projects, that keep coming and coming. My head goes round with all the ideas I have :)
Today though it's a bit rainy and I want to show you the little side table I found recently in the used furniture store. The little son of a furniture was hard to notice but I saw him and had pity on him :) Now it is going to be a present to my husband, he can use it for storing his phone and clock and keep it next to our bed.
Little cute table found his home.. All right, you can put  the tissue away and see for yourself:
Annie Sloan paint in old white and clear wax was used for this transformation. Also I decoupaged the antique maps on it using Mod Podge. I distressed the edges everywhere and here it is... Oh yeah, almost forgot, first I painted the table with Americana décor chalky paint in "primitive" colour, you can see it through the old white layer.
Do you know by the way how this thing officially called rather than side table?

Comment, follow and like my Facebook page for more and more! Be happy!!!

If you want to use antique map printable for your project you can find it on my pinterest board "vintage graphic - coloured". 


Monday 30 June 2014

Bread box redo

Shabby chic kitchen decor

Hello, Happy Canada Day to everyone!!!
My latest project is a bread box! I was looking for old bread box for a long time, finally found one at my favorite store "FIND".

Isn't it cute? :) Annie Sloan and dark wax did a job! Some images transfer and you have an old french country style bread box for your kitchen. Check the GraphicsFairy for the printables. 


Friday 20 June 2014

How to make antique letter poster

Hi everyone, 'twas awhile again, but I am here. Enjoying summer days, slowly crafting and painting. Here is a new post for you on how to make "antique" letter poster to hang on the wall. Such a poster quickly gives your room "antique atmosphere" and vintage feeling. It will perfectly fit your shabby or french vintage style room. Also it is very low cost to make this beautiful wall art.

Materials:
  • Canvas of preferred size
  • Printed images of your choice (laser printer)
  • Mod Podge
  • Lighter or candle
  • Distressing ink 
  • Spray acrylic sealer
How to:  
(I used the back side of the canvas, the one which wasn't primed)
  • Take off the canvas from the wood frame, you may need pliers or something like that to take the staples out.  Don't worry if you rip the material a bit, we are going to distress the edges anyway. 
  • With the help of a lighter (please be careful with fire, do it outside maybe with water near by) burn the  edges which were distressed beforehand manually or with scissors. 
  • Use the distressing ink (Tim Holtz brand) to age and stain the canvas around. 
  • Transfer images using the Mod Podge , see my other posts  for tutorial on that 
  • Seal it with the acrylic finish 
  • Using glue gun attach canvas to the wood frame
  • Enjoy your masterpiece 
I used the image of the coat of arms of Great Britain (I customized it a bit). You can find similar image here 
Also I used different kind of vintage looking fonts, you can download them from www.Dafont.com, below are the names of the fonts:
  • Numismatic Bats TFB  (for stamp looking details)
  • Signarita Zhai (for main text)
  • Paris Label  (for top right text)
  • Strassburg Faktur (for the second headline)
  • Jenuary Script personal use (used next to the coat of arms)
  • Jellyka saint Andrew's Queen (for signature below)
  • Cornucopia of dingbats Four (for ornaments)

Please, don't burn your fingers :) ... coz I DID


How do you like this kind of art? Let me know what you think ;)


Wednesday 21 May 2014

Side Table Redo with Chalk Paint

..............And here it comes:


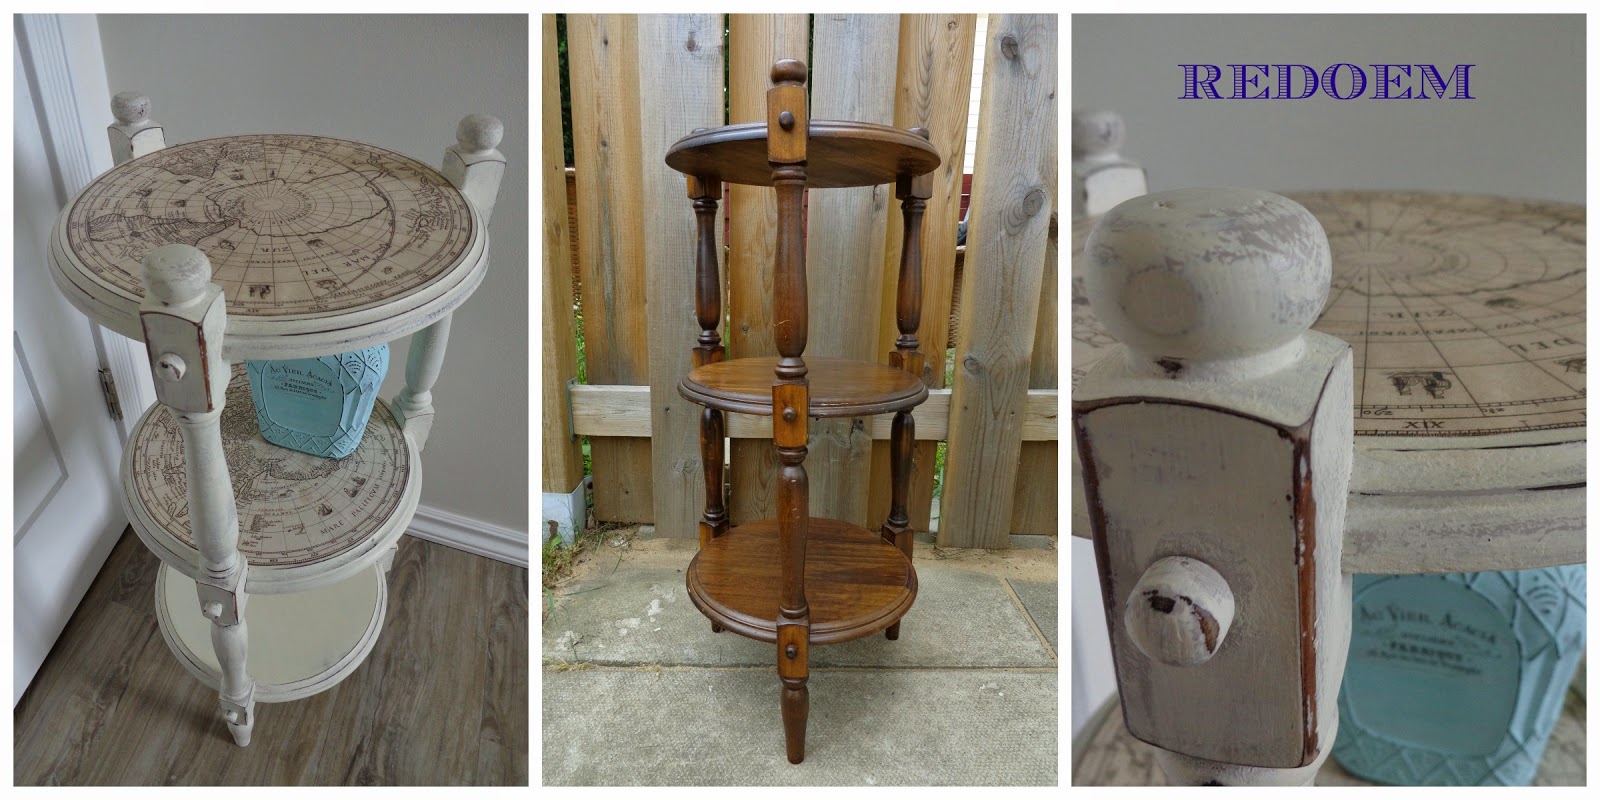
My first experience with furniture painting and with Annie Sloan chalk paint. Now I want to share my tips  and impressions.
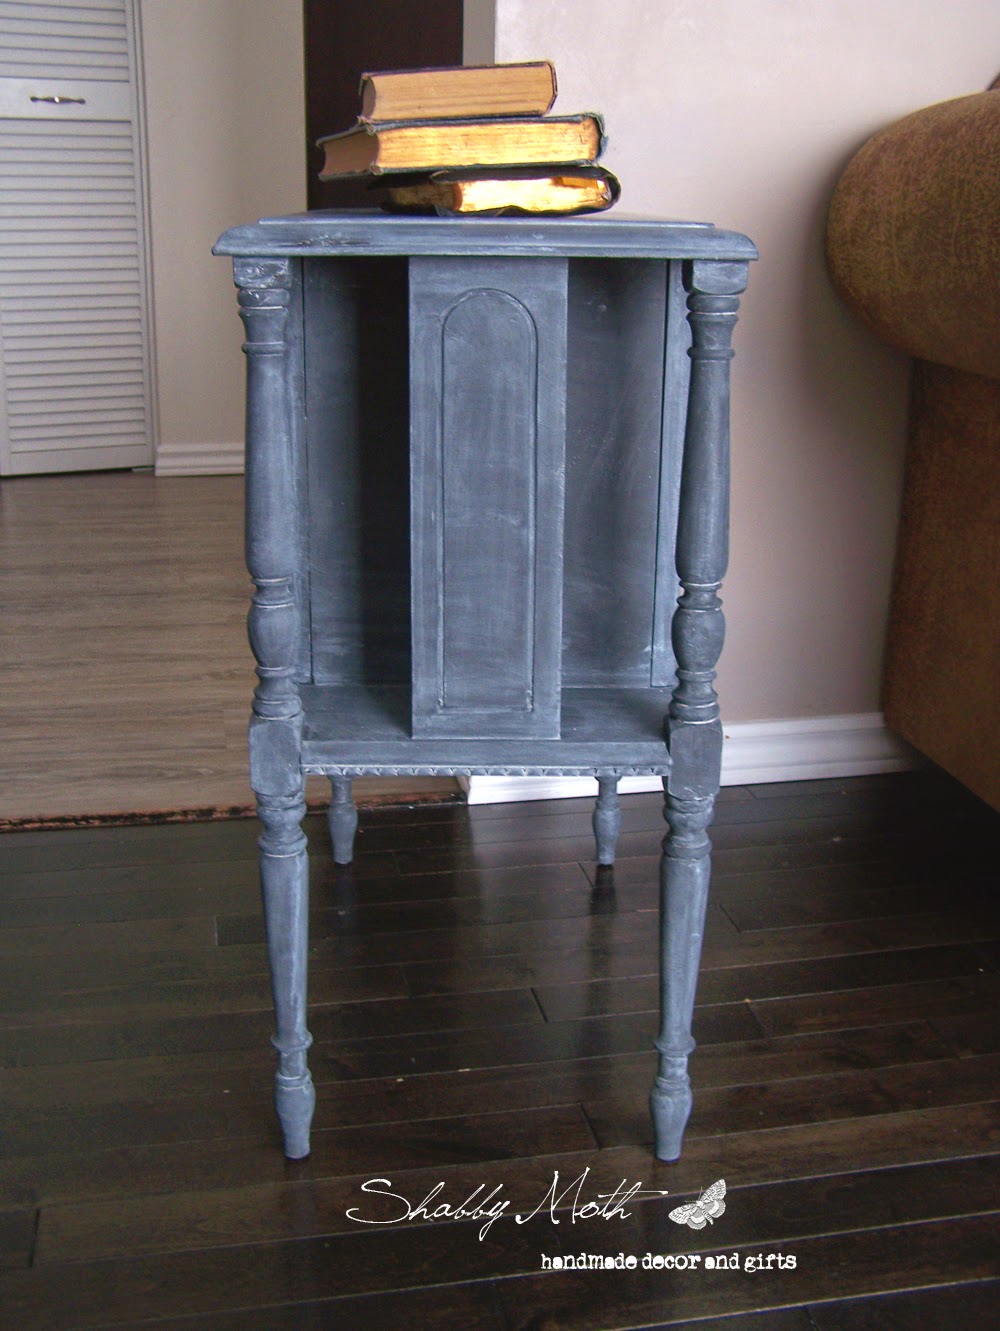
Originally the table suffered the water damaged, so tip number one for thrift store shoppers: Avoid water damaged items. It wasn't too bad, but I had to sand some spots where the surface was "swollen" and as this table not a wood one, I had to sand the laminate off which revealed the chipboard texture - no good, as I didn't want to use the spackling to even the surface. I did this table for myself and I don't mind those little texture differences, but I would do better job if it was for somebody else or for sale. And next time I am going for wooden pieces: you can't sand laminate, people...... oh, wait, it just me...
Now, the base for the table was absolutely destroyed, so I knocked it down an replaced with the leftover window trim we had in the house, worked perfect. Don't bother with the carpenter glue, go straight for PL 400 (home depot), it stuck together hard as rock in minutes: no nails, no clamps, super fast and easy.
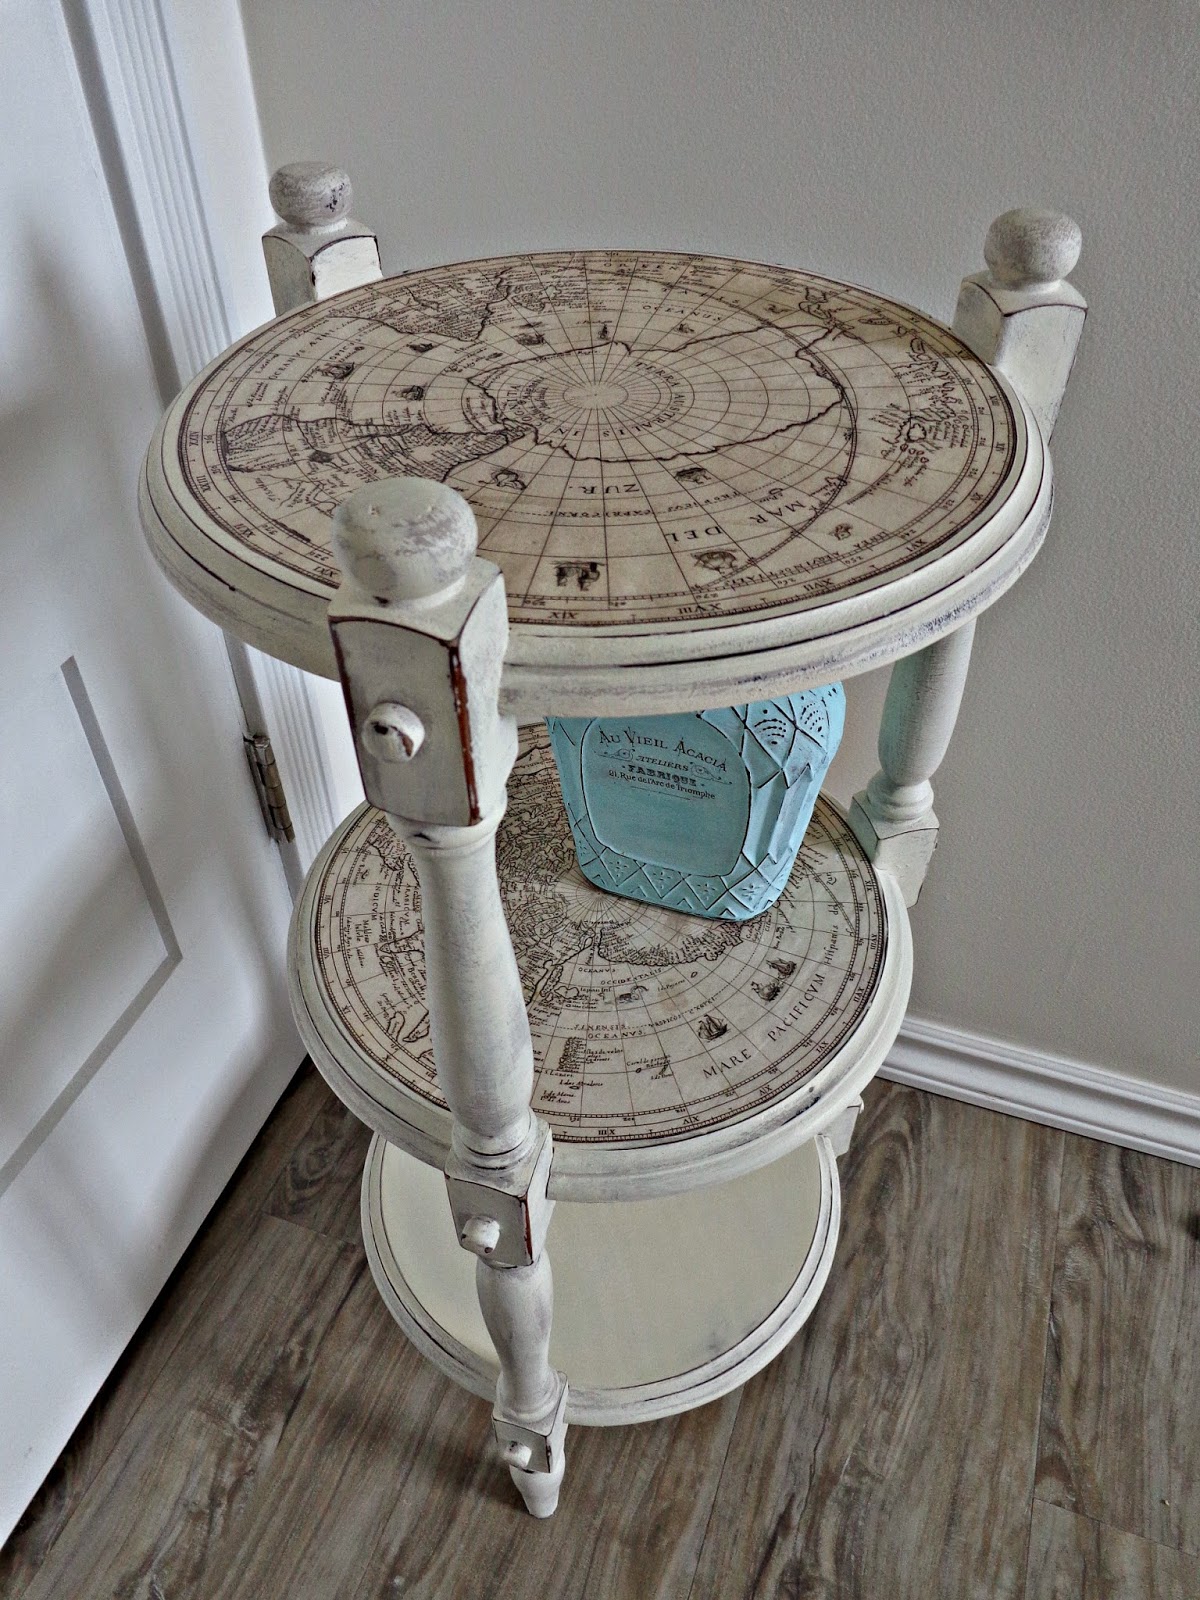
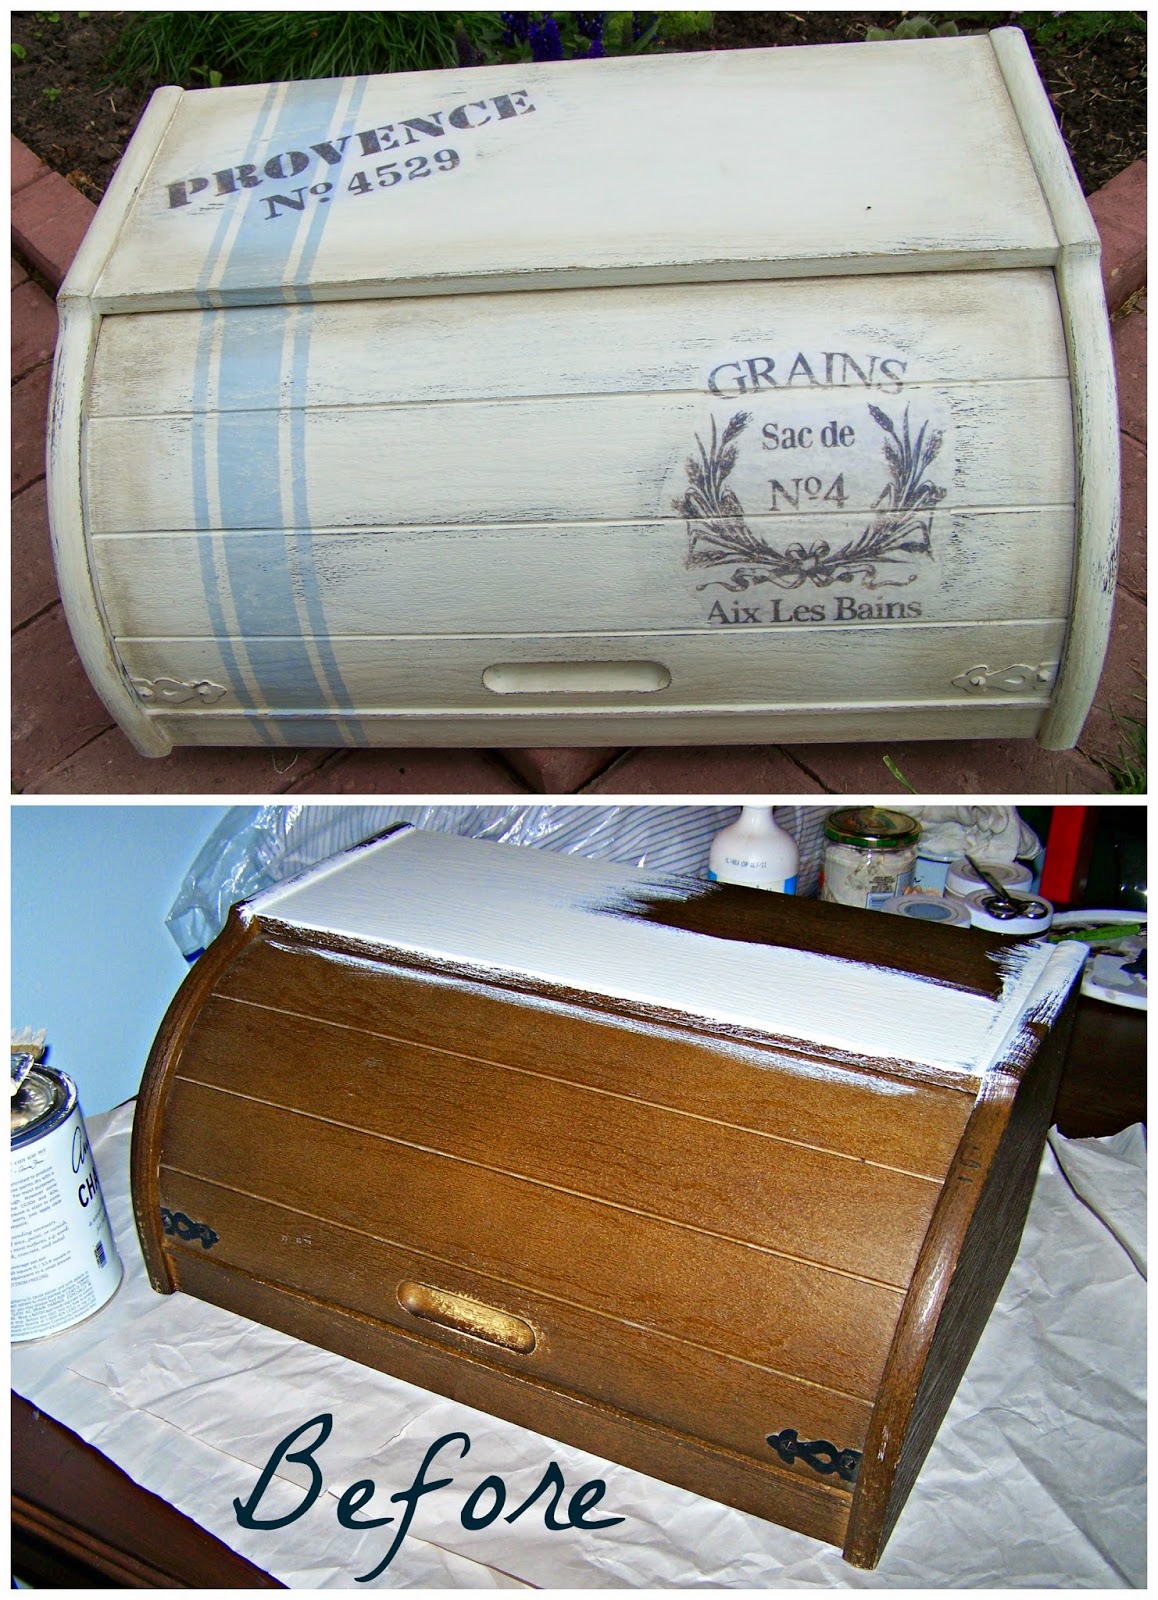
After all that was done, I started to paint it... with the trembling hands and heart I was opening the legendary chalk paint can.... doesn't stink, looks good, colour is dreamy... brush? used home depot dollar paint brush, works good, saved 30 dollars, wouldn't mind to try AS ultimate brush though.... oh well, next life. Tip of this stage is: use extra container to pour the paint for the project, otherwise the paint will thicken if you leave it open for a while. I had to add some water to my can, that's what Annie Sloan said to do, it helps indeed.
But it better to put some water in the container rather than into the paint can itself.
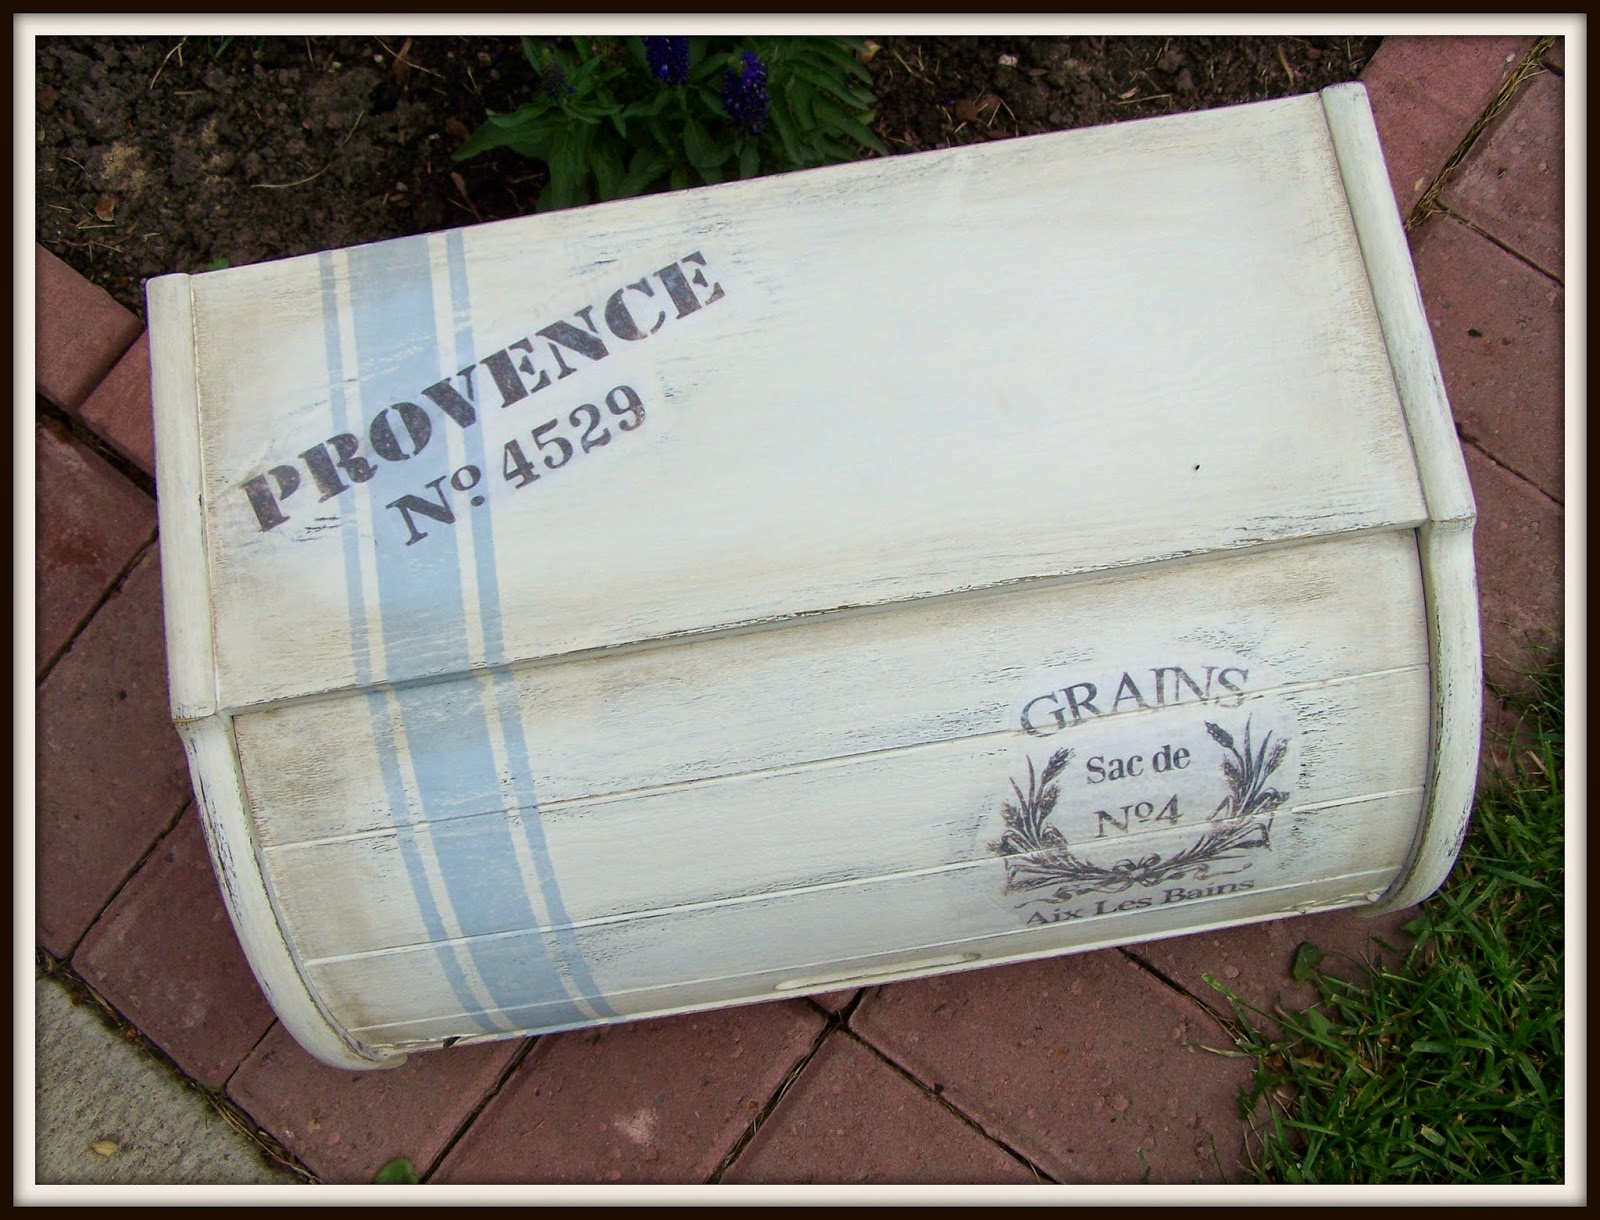
As for layers, I have no idea how you can put only one layer of paint to cover the piece (I heard many succeeded in this). I did 2 full layers, was thinking about third one, but two was just right, when it dries you can see it's enough.
And I loved how the clear wax by AS worked. Had no problems with that one. The main point here: use just a tiny amount at a time and work it in as a hand lotion. This advice from Annie is so useful I have to admit. I read a lot of people had trouble to apply it, but no - listen to the Lady, she knows what is she talking about. I used an old t-shirt and worked in a small areas at a time. To see where the wax applied or not I used the hand light in different angles, you will see the darker areas where the wax is already applied.
Dark wax is still a bit puzzling to me. I used Miss mustard Seed antiquing wax, not sure if it works the same as AS dark wax, now I am interested to try it to compare. I keep thinking though I could do a better job with applying the antiquing wax. Next time I'd put it only on the edges, to make a colour differences, which I did on the sides of this table, but in front I think I applied too much. I couldn't easily remove it after even with the use of the clear wax. The tip is (which i missed) to apply dark wax right before the clear wax coat is dry. And I waited a day before applying dark wax on the table.
So, these are the things I learned. In general I am satisfied with the results, I like the paint and waxes, nice to work with, easy and fast. Waxing takes some exercise but it's good for you. I believe there are less expensive alternatives for the AS paint, but here you don't have to mix it yourself and you've got enough paint for several projects. Americana Decor chalky paint works the same way and a bit cheaper, but here in canada we don't have a big cans for it, just sample sizes, otherwise I would buy it instead of AS Chalk Paint.


Summery:
1. Avoid water damaged furniture pieces while shopping in the thrift stores, also choose real wood items over chipboard ones.
2. Use PL 400 subfloor glue for easy and fast fixes. Strong adhesive for quick results.
3. Home depot dollar brush works really good for the chalk paint and old t-shirt for the waxes. But for waxes you might think to invest in the special wax brush, as it can reach inside of the crevices much better.
4. Use a high grit sand paper after paint is dry, it gives the piece very smooth finish. Sand after waxing to avoid dust. Than reapply wax.
5. While painting keep you can closed and use another container for current project, helps to keep your paint from thickening. If thickens add water, mix well.
6. Secret to successful waxing: use tiny bit at a time, apply as if it was a hand lotion, with the circular motions.
7. Use hand lamp in different angles to see where the wax was applied. Treated areas are darker.
8. Apply dark wax before clear wax is dry, helps to fix the dark wax mistakes easy.


Hope it was useful, leave me comments and your thoughts, please. Join for future projects and updates! Thank you for being with me :)

Friday 2 May 2014

Annie Sloan Chalk Paint Project

Hi, my friends!
Today I finally visited the store that carries Annie Sloan Paint, this is the first and the only store in my city where you can find this kind of paint , they also caring Miss Mustard Seed's Milk Paint. If you somehow do not know what are those paints are, I can tell you there is a big fuss going around it among the DIY'ers . :) Most of them just Loving It! I, myself, have never tried it before and can't tell anything just yet. ...But look here:

I bought some, yes. Can't wait to figure it all out for myself. After I done painting my project I will give you my honest opinion. So far from what I heard it's the best paint that gives furniture beautiful matte finish, it also created to give objects the antique look, because it can be perfectly distressed. (I know I'm not opening the America, but for my friends overseas this will be new information.) I heard also that even though these products are costly, it all worth the investment (we'll see). I love the color choice ASCP offers. They are beautiful, very suitable for many vintage styles and chics :) 
Here is a sneak pick for what I am going to do: 
 This baby is ready to be transformed. My plan is to paint it with ASCP "Old White" color, clear wax it and distress with MMS Antiquing wax.  - Why I didn't buy the AS dark wax?  - Because my inner Jew didn't let me...
Annie Sloan Paint and products are pricey, before I decided to invest in these specific products I investigated a lot about it over the internet, counted all pros and contras, realized that maybe AS Chalk Paint is a little bit overrated and you can even make you own chalk paint for much lesser money (which I really possibly will do in the future), but... I need to try ASCP first.

Please, give me your piece of mind on these matters :) What you prefer: ASCP, MMS milk paint, DIY chalk paint OR.....???  What you think about dark waxing, clear waxing? I need your experience!
If you are from Canada, which products do you use? Because, as I say, we don't have much choices here.

Tuesday 29 April 2014

Ceiling Fan reDo

Hello, my friends!!! Beautiful warm day today after long winter. Things like that make me happy :)))
And today I want to show you my new ceiling fan. I'm "going vintage shabby" for my house , slowly, but steady :) So every single thing in my house just begging to be repainted!
Here we go, ceiling fan, Ladies and Gentlemen:
BEFORE                                                                              AFTER

I want to tell you a little bit how I did this. So the algorithm is : 
  • Stencil with spackling using palette knife (after spackling is on, just lift the stencil from one edge to another {in case you are using sticker stencil like I did})

  • Painting with Americana Decor Chalky Paint (I'll talk about this paint later in the post).
  • Whitewash with acrylic paint (brush paint, in a minute wipe paint off with the paper towel)
  • Seal with Mod Podge matte finish
I was learning a lot lately about chalk paints and really wanted to try them. My dream is to paint some furniture with Annie Sloan Chalk Paint this summer. But for now I decided to practise with smaller version of chalk paint - Americana Decor Chalky Paint:
Luckily they finally selling those in Canada. No, not in Home Depot yet, but in Michael's. Yeah, my USA friends, you have to be really happy because I find you have much more choices there for everything... anyway... I really loved this paint and how it worked. For the fan I used chalk paint in "primitive" colour. Initially I wanted it in "lace" or "white", but those colours were gone with the wind (I imagining the wild crowd took place...). I loved how smooth the surface was after I sand it a bit, I also loved the coverage this kind of paint gives. I tried to paint the blades with regular acrylics first, but it would take no less than 4-5 layers of paint to cover this laminate kind of surface. Colours they provide are beautiful and this paint is relatively cheap, which is good, with a 40 % off coupon from Michaels I paid about 8 dollars for 224 ml container. Yeah, I was really happy with the paint! I don't know how it differs from ASCP, but I don't think it much better than Americana one. 
What do you think? Did you tried them both and what difference did you find? Will be glad if you share your opinion!!!
PIN to your collection!!!!

Thursday 24 April 2014

Spice Rack update


Hi, guys, I moved here => www.lanastonedesigns.com
Hi, everyone. I'm here with the spice rack update. Now it's officially finished, holding cute spice jars. They are from dollar store and the labels are from The graphic fairy!!! I printed the labels on laser printer, then cut them out, moist them with water, brushed mod podge on the back, glue to jars, also applied the mod podge on top brushing from the center to the edges.


 To download these awesome labels click on the images:


I typed the spice names myself using the Photoshop program. You can download them on my Freebies page So, how do you like this vintage update for my kitchen?


LIKE my facebook page for updates and more inspirations:reDOem & Shabby Moth